

I designed my echo-matic panel in the style of the Univox EC model tape delays

Here's my setup: 1/4" instrument input and output, and RCA I/O's to connect to the tape recorder. I'm using a Marantz PMD221. I modified this machine slightly by adding a second pitch control. That's what that little knob at the top right corner of the marantz unit is. This knob adjusts the pitch drastically for slower delay effects.

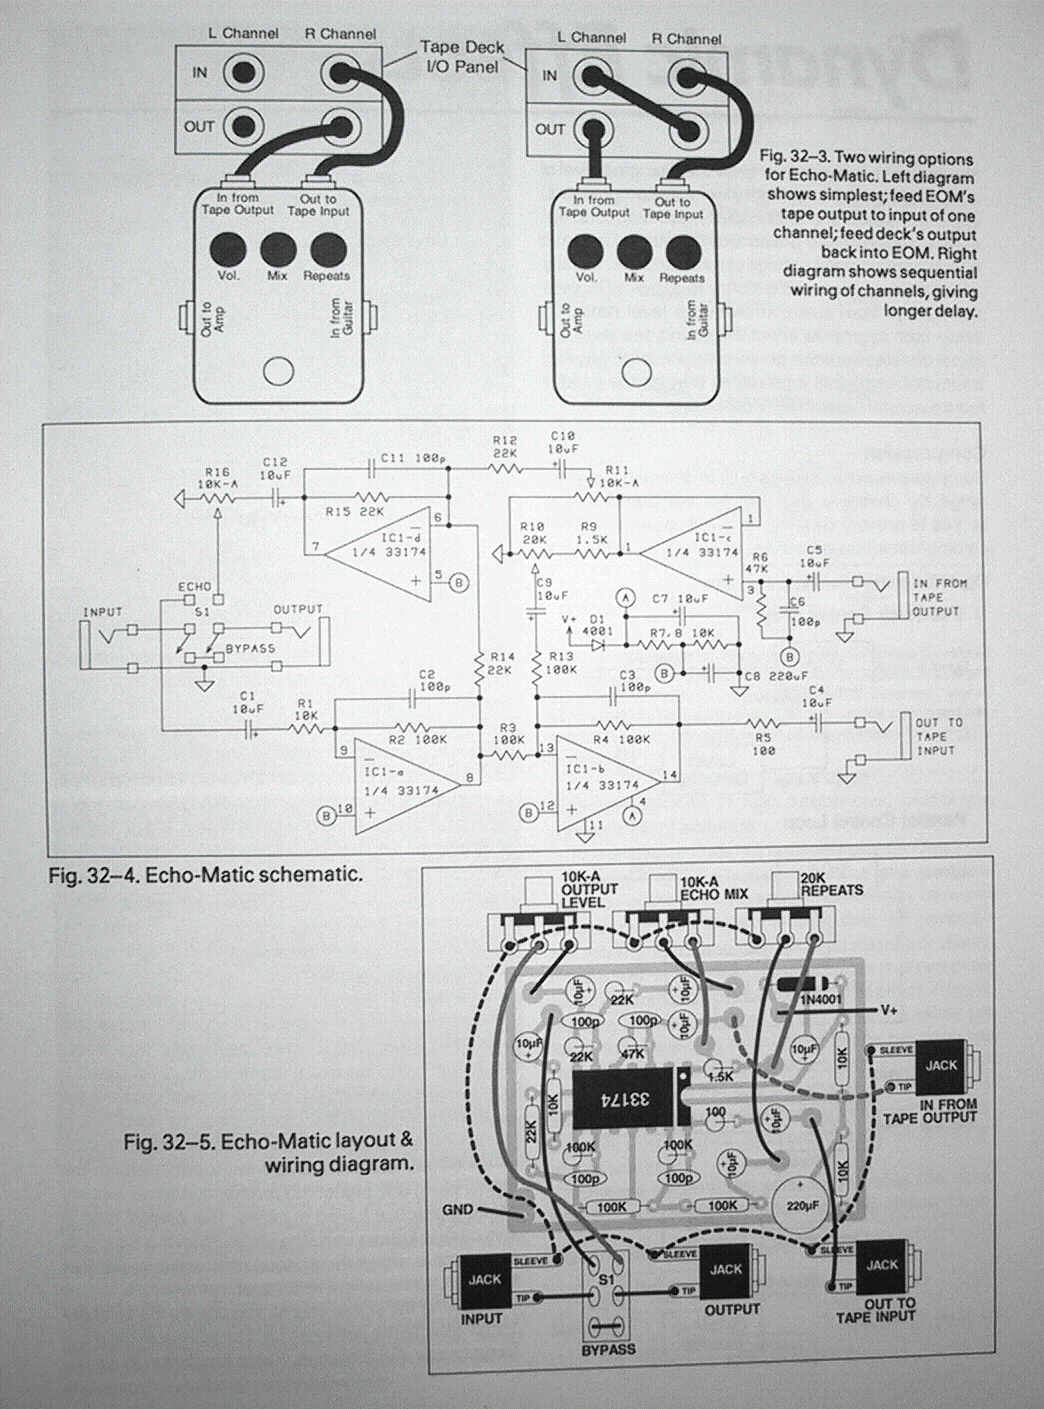
This surprisingly simple circuit turns any 3 head tape recorder into an awesome sounding tape delay machine. The tape recorder has to be a three head unit (erase head, record head, and play head) for it to work. This type of recorder will have a button or switch that allows you to listen to the source audio, or what has just been recorded to the tape. The small gap between the record head and the play head creates the delay effect. I'm a novice when it comes to circuit design, but the schematic just looks like four buffers and some pots to mix the different signals together.
Here's the original literature for the echo-matic:
And here's a layout I redrew from the above article. It's 600dpi and the image is reversed for photosensitive boards.

Echo-Matic PCB Layout PDF Version For easy printing!

Gutz! :]
Per request:
Here's some additional photos and info about the mod I made on my PMD221.

Per request:
Here's some additional photos and info about the mod I made on my PMD221.

The Pitch knob had a 1.2K resistor in series with it. All I did was desolder one pin of that resistor and replace it with a 1k pot. In the picture above you can see the wires running from that circuit board to the 1K pot attached to the battery compartment door. With this mod, I can get the delay times to somewhere around 500ms before the tape drive stalls out and stops.

A closeup of the solder points

I don't run this unit on batteries so sticking the pot in the battery compartment seemed like the best place to for it.
Do you offer the PCB for sale?
ReplyDeleteDitto...
ReplyDeleteI hadn't planned on selling any PCB's. I offer all the info and files to make your own if you know how, or if you know someone who knows how.
ReplyDeleteThis comment has been removed by the author.
ReplyDeleteHow do I make the case and pots though? Do you use a machine?
ReplyDeleteHow do I make the case and pots though? Do you use a machine?
ReplyDeleteThe blank case and pots where purchased. I had to machine the holes in the case and make the front panel design. This is not intended to be step-by-step instructions. It's for DIYer's with at least some experience building electronics.
ReplyDeleteIf your new to this kind of stuff and want to learn more, I recommend you read what you can, learn the fundamentals, start small, experiment (be safe), and have fun.
cheers
I’ve seen your post on building this board, and I’m trying to figure out how I can use the PCB Layout you have on your site. What are the dimensions so I can use it with a photosensitive PCB, or what method do you suggest? How do I download the image so I can print it to proper size? Thanks.
Delete-NEW LINK- I added a PCB layout in PDF form for easier printing. Photosensitive PCB is my method of choice.
DeleteI'm looking for something like the echomatic that's stereo and pedalboard friendly. Any ideas?
ReplyDeleteTo clarify, the mixer/send & receive portion, not the tape player/recorder. Thank you
ReplyDeleteHey man.
DeleteSounds like you just need a simple mixer or feedback looper or something. I'm not sure what your application is but a feedback looper can be really simple and done passively with a single pot.
Would you mind sharing the modification you did to your PMD221?
ReplyDeleteI have a PMD222 that I successfully modded to enable use of the existing pitch control in recording mode. I'd estimate that it now reaches about 250ms delay times. Would like it to go a touch slower though!
Sure thing.
DeleteI forgot what I did exactly. I think there was a logical reason why I didn't fix the existing pitch control to have a wider sweep. If I remember correctly, the pot I added replaced a resister somewhere in the pitch circuit. The mod is nice tho, and can slow the machine down to a stop practically. When I get a chance, I'll post better details.
Thank you!
DeleteYou got me curious :)
DeleteI posted some additional pics of the PMD221 mod. I can get the delay times to roughly 500ms ,I think, before the machine stops. Hope that info helps you out. I don't know how different the 222 is.
Hey Mihran, can you explain how you modded your 222 to use the actual pitch knob while recording ? I'm very very interested by this feature !
DeleteNice work!
ReplyDeleteIs there a hole between the two cables? it was made by you, desoldering? is that it? soldering the two wires and melting the solder in that hole?
Thanks in advance
Sorry, I'm not sure what your referring to in your comment?
DeleteHello, sorry for the confusion.
DeleteJust wondering if we only need to solder the blue and purple wire to the board or we need to do take out some solder of any point.
So cool! Questions from a curious mind... First, do you have any recordings? I'd love to hear this thing in action. Also, what did you use for an op-amp? And finally, how do you you do those cool colorful enclosures?
ReplyDeleteThis comment has been removed by the author.
ReplyDeleteGreat stuff!!! I'm building one of these myself - do you have the PCB files available?
ReplyDeletethanks
Thanks!! I only have the old school transfer image for making the PCB yourself. The image in this post is the exact image I used to make my board.
Deletethanks for the reply - I've never done my own PCB before, but it doesn't look to difficult. Do you use the photo-paper & Ferric Chloride method?
DeleteAlso, regarding the pot you installed for speed control - can that alter the speed during record or only during playback?
thanks again ;)
This comment has been removed by the author.
Delete
DeleteI got PCBs and the gerber files for it. Message me if you're interested!
Hey there! I'm VERY interested by both but can't seem to be able to message you. Hope you'll see this reply somehow ;)
DeleteHey, yea I can only get messages to work when I use the Chrome browser. hmm, I wonder why...
Deletethanks so much first of all. I have been chasing the idea of a DIY tape delay build for a long time adn this is by so far the most promissing looking one that might actually work adn serve in live shows and recordings!
ReplyDeleteonly a few things stands in my way. Since there is no schematic diagram is really hard to follow the circuit path from the description 'literature' you attached.
Usually I would build projects based on tag boards but this one is worth messing around and etching the PCB. Only I dont see where exactly the potentiometers are connecting. Would it be possible for you to upload exact fotos that shows where does the potentiometers lugs connects to on the board ? as well for the In / Out jacks ?... as well for the dc jack ?
really looking forward to building this as soon as those things gets cleared out I better start looking around for a PMD unit :)
cheers and thanks!!!
oops sorry about that
ReplyDeletenow i see i missed the second gif link :D
cheers!
Yea, no worries. The links are not super obvious.
Deletewhat should the dimensions of the PcB be?
ReplyDeleteHi, The PCB should be about 2" x 1.5" Make sure the layout image isn't being resized when you go to print.
DeleteCan't download the PCB image! :(
ReplyDeleteWorked now. Thanks!
DeleteGlad you got it figured out. cheers!
DeleteStill have one question: how do you get the pitch pot to work during recording?
ReplyDeleteOr didn't you bypass the bypass function? If just adding the pot does the trick, I think I might do that as well.
DeleteWhat's your tape source? Make sure your recorder is on it's monitor setting. The speed of the tape machine (or distance between the record and playback heads) is what determines the pitch/delay time. I don't know if that answers your question. let me know if you get it working :)
DeleteOh, I get a nice tape delay and everything, it's just that the pitch knob is disabled when recording, and that I'd like to circumvent that somehow.
DeleteMy last question was about wether you bypassed the function that disables the pitch control when recording or if you just left it as it is and installed another pot for speed control.
did you use the 1k linear taper or log pot? also the previous question was whether you bypassed the original pot
DeleteThis comment has been removed by the author.
ReplyDeleteThis comment has been removed by the author.
ReplyDeleteI built this on my breadboard and it works but if I turn the 20k pot for repeats up very much at all it squeals. I'm seeing other blogs where people have had the same problem. I did not use electrolytic capscitors. Could that be the problem? I notice that when I unhook the ground from the 20k pot I get the same squeal. So that makes me think the capacitors aren't the problem. The echo effect is working but I only get one repeat. If I turn the repeat knob any higher it squeals. Is anyone else having this issue? Is there a fix?
ReplyDeleteHey David, I'm glad you got the Echo-matic working kinda. I'd recommend keeping the capacitors in the circuit. The bypass caps on the inputs and outputs don't need to be 10uf electrolytic. You could use .22uf film caps for those I believe. The power supply filter caps I would definitely add if you don't have those on the breadboard.
DeleteFor your squealing problem it's probably due to high input volume. Turn down the recorders volume way down and see if that helps. I bet it's feed-backing to much for the circuit to handle.
Ok I'll just order the electrolytic caps and keep playing with it on my breadboard until then. Thanks for the reply and thanks for sharing. This is a cool project
DeleteI ordered the electrolytic caps and got it working! To get rid of the squeal I just put a 10uf cap across the +/- on the "out to tape input" jack and now I can turn the recorder volume all the way up with no squeal. It seems to get more repeats the higher the recorder volume is set. Now I just gotta work on modding the tape recorder to slow the tape speed so i can get a little longer delay. Even as it is now it sound great. What a fun project.
DeleteI had my friend do a demonstration of the echomatic I built using the info on your page. Check it out https://youtu.be/aLXGrVIG7UI
DeleteSweat!! Thanks for sharing :)
DeleteI was wondering if someone knows how to build the echo case directly inside the Marantz PMD221 and power it up directly from the Marantz ? any schematic ? thanks for your help ?
ReplyDeletelike this model : http://www.ondemagnetique.com/shop/cassette-tape-echo
ReplyDeleteThat's pretty cool! It wouldn't be too hard to replicate. The battery compartment is big enough to fit all the echo-matic components. A LM324 should operate fine on 4.5V. I'd tap the voltage on the power switch. The Tape-in and tape-out could be soldered directly to the PMD221 main board or on the back of the line plugs. The only thing I don't know about is the CV input. It may just be a jack in series with the Delay Time pot.
DeleteStephen's Question: If the circuit for the EchoMatic is for 9V, how can it work if you use the PMD221's 4.5V power supply?
DeleteThe echo-matic is a pretty simple circuit that only uses one quad op amp. Certain op amps (like the LM324) operate from a wide range of supply voltages. 4.5V would work fine.
DeleteThank you for this write up! I am going to attempt to build an echo-matic this week. I had one question I was hoping you could help with. I am also going to mod my pmd221 with a speed control like you did. I am new to this, but which pin of the 1.2 resister did you desolder?
ReplyDeleteIf you study the pictures closely you can strait copy what I did. I de-soldered the side of the resister going to the factory speed pot. The blue wire is soldered to the other side of the resister, and the purple wire is soldered to pin 1, i believe, of the PMD speed control pot.
DeleteIn 3 weeks time I will have a little kit ready inspired by the above circuit but does also has a tone control.
ReplyDeleteAnd it's full assembled and everything sobered. all you need to do is adding pots.
DeleteHey unknown. Any chance you still have that hookup? Where did you find the diy parts together?
DeleteThank you in advance. I know it’s been a while
Hey Mr Schlock. The linkto the PDF is not printable or downloadableany more. When you try its says too many redirects. Would there be any chance for you to reupload it?
ReplyDeleteHey there! Wicked project, it inspired me to do the same and get into pedal building. I built the circuit and tested it on a different 3 head tape deck with great success, but when my eBay-ordered PMD arrived, I got this constant high frequency FM-sounding screaming sound coming through almost constantly, like a feedback loop. Since the circuit works no problem on a different deck, I’m relatively sure this is a problem with the marantz. Have you experienced this? Is it a factor on your unit as well or did I just get a lemon?
ReplyDeleteThis was answered above, I think. I think you are feeding too mcuh signal to the deck and getting too much feedback, see above
DeletePCB's for sale...
ReplyDeletehttps://www.ebay.com/itm/323801640250
Selling any more Echomatic PCBs?
DeleteHey there - I'm in the process of ordering the components but have a couple questions: what does R5 "100" mean? 100k? Or something else...? And for the 20k pot - will a 20k "W" work? Or do I need a regular 20k linear? One last question - the Marantz cassette recorders are $100+, which kind of defeats the purpose of "tape echo on a budget." If I find a 3 head cassette recorder (more than likely a large format, home stereo sort of device), will that still work if it has the appropriate RCA ins and outs, and 1/4" headphone jack? Thanks so much for any answers you can provide!
ReplyDeleter5 is a 100 resistor, make sure you use a 20k-b pot, and 2 10k-a pots. the cassette player must have 3 heads. watch this to understand how and why https://www.youtube.com/watch?v=RYz2J4DmxVA&t=615s
DeleteYep MattDGTL is right. R5 is 100 ohms, stay with the linear pot, and any 3 head tape recorder will work.
DeleteThe Marantz recorders have gone up in price the last few years. I probably paid less then $50 for mine.
P.S. Nice video! :)
I have some PCBs for sale. Check soundefects on instagram. Separate dry and wet controls
DeleteNice work fitting the PCB in the battery compartment.
Deletedo you still have some PCB?
ReplyDeleteHey there, just curious if you've encountered PMD 221's with different PCB's than yours pictured. As such the service manual isn't much help. My PCB looks like the one pictured here:
ReplyDeletehttps://farm2.staticflickr.com/1594/24447796705_82e5fd26fa.jpg
I can't find much info on this but am determined to get this modded so I can use it as a tape delay.
Yea that PCB does look a bit different. Must be a different board Rev? Also I think that picture is for a different mod??
DeleteMy mod is simply replacing the resistor, that is in-series with the pitch pot, with a potentiometer. I imagine the layout is pretty similar. If you locate where the pitch solders to the main board you should be able to trace out where that resister is.
Godspeed,
Any luck here? I also have this style PCB, but unsure how to find where the pitch control is located on the PCB. Any help would be appreciated!
DeleteIf you post some detailed Photos I could probably point out the general area where the resistor should be.
DeleteHey, so I'm trying to find the IC op amp online and it seems that it's obselete and not in stock at mouser/digikey/tayda. I figure it's possible to switch out the op amp for a newer model, but I'm not experienced at interpreting datasheets. Do you have any insight on this? Thanks so much for the post btw, it's been super helpful :)
ReplyDeleteHey, There's nothing special about the IC listed in the original literature. It was probably a common quad op amp at the time the article was written. I think you can use just about any quad op amp as long as the pinouts are the same. I think I used a LM324. A TL074 should work fine also.
DeleteBest :)
In this blog converter Design Services involve the development and optimization of electronic circuits to efficiently convert electrical power from one form to another, ensuring reliable and precise performance for various applications.
ReplyDeleteDoes anyone have pcb gerber files or anything beyond the PDF available here?
ReplyDeleteComment 3:
ReplyDeleteIt’s easy to forget about VCR tapes when you're thinking about modern media formats like DVDs and streaming. But the magnetic oxide on those tapes is literally flaking off! For anyone serious about preserving their home movies, the crucial step is to Convert VHS to Digital for long-term safety.